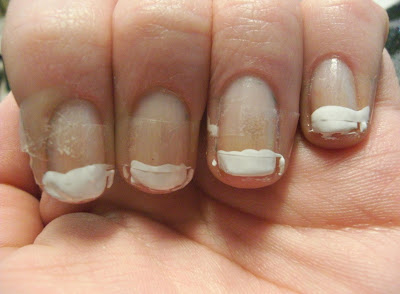
1. Place a piece of tape around your nails at the tips, make sure there isn't any gaps. Then you want to paint the ends of your nails white. The tape will make a sharp, straight edge. This is actually how I do french tips. It requires no skill whatsoever!
-There are French tip stickers out there that you can buy if you want a more natural, curved tip.
-You can also use a white striper if you have one.
When the polish dries, slowly take the tape off and it should turn out like this.
2. Take another strip of tape and cut it into thirds lengthwise. Then place two of the strips close to each other, leaving a tiny gap in the middle. Paint that part black. You might want to avoid putting tape on the white tip, I found out that the tape lifts it off your nail.
-If you have a black striper, you can use that to save you some time.
-If you don't own a striper, you can make one by wiping off the polish from the brush and cutting it until you get a small strip of tightly packed bristles. Just dip it back into the bottle and you're good to go.
After it dries, slowly take off the tape, again. If there are some blank spaces, just take a toothpick, dip it in the black polish, and fill it in.
Do this to all your nails, making the black line generally in the same place.
3. Take a toothpick, dip it in the black polish, and draw on some birds. I found that if you use a dabbing motion, you can get the best color payoff. Just take your time and have fun with it!
4. Wait for it to dry completely and seal it all in with a clear topcoat. Then you're all done!
I did a few different bird designs for you guys. The normal one, a Mamma and Baby bird, love birds, and a sparrow. You can always look up birds sitting on a wire if you want more references.
This was the first day I wore this and I've already been getting compliments. If any of you try this, tell me how it turned out. See you next time!


Wow so easy! I love the detailing of the birds, can't wait to try it myself!
ReplyDeleteFashion Ganache.
http://fashionganache.blogspot.com
You'll have to tell me how it turns out. XD
Deleteso lovely,will def. try this out and m already following you :)
ReplyDeletewould be really glad if you'd follow me back xo
http://byangchee.blogspot.com/
Thank you for the follow! And I hope you found this post helpful. Good luck!
DeleteHi Sonya!
ReplyDeleteI nominated you for the Liebstar Award! ^^
Please check out my page for all the details!
Can't wait to read your answers.
X
http://mnguyenn.blogspot.com.au/
"Cool post!
ReplyDeleteMuch love,
Wengie
www.wengie.com"
"Keep up the great work on your blog! <3
This comment has been removed by the author.
ReplyDeleteNice tutorial and the nails look artsy! :D
ReplyDeleteVisit back please.
audreysjarief.blogspot.com